Xeon Wraith
-
Posts
106 -
Joined
-
Last visited
Content Type
Profiles
Downloads
Forums
Events
Gallery
Everything posted by Xeon Wraith
-
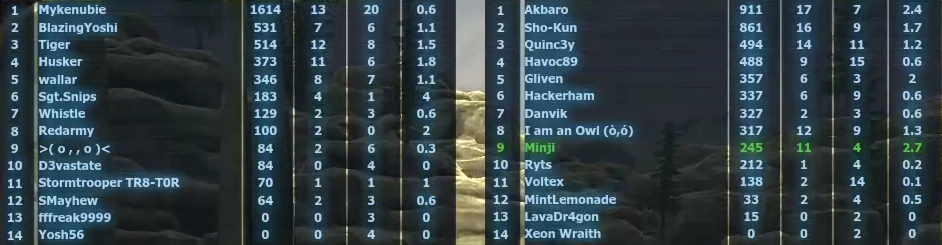
24/11 Sat Nod PUG Part Three @yosh56(2) vs @Redarmy(2) Match 1: Eyes (Winner: Yosh - Nod) Both teams get harvester, though Nod pauses theirs. Nod rolls Arty/Lights, GDI with MRLS/Meds. Both teams push up to secure control of the tiberium cave. Nod's early rollout gives them a head start however, allowing them to pressure GDI's 2nd harvester. GDI manages to push back Nod's repairless tanks back to their side of the cave and the tiberium field exchanges control a few times. GDI also pushes tanks to the outer paths, which end up dueling Nod's Lights and later Stanks. Nod manages to pick off GDI's Guard Towers but is unable to put lasting pressure. Nod tries to lock down the Tiberium cave using AT infantry & Apaches but is pushed back from GDI own Infantry and Mammoths. Nod Stank rushes shortly after, getting a armour break on Refinery and forcing GDI's Mammoths to retreat from the Tiberium cave. Nod's remaining tanks push up and retake control of Tiberium cave. GDI eventually decides to Orca rush with defensive buff. Nod gets a early pickoff on the Commander's Orca and the rush fails to do damage. Nod pressures AGT using Arties and then starts to gather Stanks. The Stanks manage to get to GDI's base unnoticed killing Bar and PP. A second wave of tanks kills the Ref. GDI tries to Orca rush via the outer route, but it gets spotted and shut down. The rest of GDI's base falls. Match 2: Canyon (Winner: Red - Nod) Nod secures their harvester and GDI loses theirs. GDI tries for a grenadier rush on Ref with a distraction Patch on HoN but both fail to deal damage. Nod pushes out standard fare Arty/Flamer and GDI responds with MRLS and Gunners. MRLS missile locks prevents Nod from getting a total lockdown with a Flamer but GDI is unable to breakthrough their Arty backline. GDI tries to gradually build up tanks but constant pressure from Nod keeps GDI's tank count low. Nod manages to EMP multiple tanks and then pushes through with Flamer/Arties. The Bar dies. Rest of GDI's base shortly follows. Match 3: Walls (Winner: Yosh - Nod) Both teams secure harvester. GDI plans to not get Meds. Nod tries a Buggy surf but it gets predicted shortly after plane dropoff. A flamer trooper manages to kill off a AA Tower while GDI remotes their front. GDI commander reiterates to not get Meds. Nod rollouts Arties/Apaches. GDI gets Meds. Arties pound the WF and Ref while Apaches and plateau infantry pressure the Meds and repairs. GDI tries to get control of the plateau with a few Orcas but is unable push Nod back. Nod buffs with their Arties, dealing heavy perma to Ref. A Hotwire manages to sneak into HoN dealing equally heavy perma damage. Eventually Nod Apache rushes the PP with Arties shell the Ref. Both die. Arties and Apaches switch to WF, killing it also. In the meantime, GDI manages to infiltrate the HoN with multiple infantry and kill it. Nod gathers Apaches again, with Rocket soldier pilots for extra burst damage and rush in with offensive buff. The damage overwhelms GDI's repairs and Bar falls. Match 4: Islands (Winner: Ref - Nod) Nod tries for a early Humvee surf again but @yosh56 is bad at jumping and fails to get on. The surf gets intercepted by Nod's arty rollout. GDI pushes MRLS/Gunners to hold off the arties. GDI gradually pushes Nod back with the later Med rollout but critically lacks the repairs to sustain it. Nod cleans up most of GDI's tanks and locks them in. GDI breaks out using a defensive buff push. Field control exchanges a few times, but Nod eventually locks GDI back in with a ton of AT infantry. Arties swap between shelling the WF and Ref. GDI is unable to sustain and push tanks against Nod's Flamer and EMPs. GDI loses the WF and Ref. GDI tries a last ditch Gunner rush on HoN which very nearly kills it. Nod starts flooding high tier infantry into GDI's base and the Bar dies from a nuke. Player list from Minji's stream:
-
MRLs Turret Lock - Thoughts and Discussion
Xeon Wraith replied to Xeon Wraith's topic in Feedback & Bug Reports
Uhh...That's not because of me right? Those are the two spots I do remember actively using while you were ingame. Incidentally, there's more spots that I think are a fair amount worse than the Canyon one. The Canyon loop spot just only provides a soft counter to the flamer lockdown Nod can get. You can hide around the corner of the tiberium rock to ignore the MRLS missiles and still be close enough to pressure tanks at the front of GDI's base. -
Sun 18/11 GDI PUG @Xeon Wraith (2) vs Democracy (2) Match 1: Gobi (Winner: Democracy - GDI) Both teams lose harvester. Both teams try to get a upper hand by buying Humvees/Buggies. Neither do. Nod tries to roll out LCGs/APCs but miscommunications causes them to try rush with them instead. GDI APCs rushes the HoN in the meantime uncontested. The HoN explodes. Nods tries to do a number of APC rushes with defensive buff but with no success. With no advanced infantry on a infantry map, Nod surrenders. Match 2: Snow X (Winner: Xeon - GDI) Nod rolls out with Arties and Lights. GDI does nothing for a bit till Nod rolls into GDI's base. GDI gets Gunners and MRLS to push back the tanks, but not before taking heavy perma damage on both buildings. GDI starts stacking Meds and turtles for the second wave of Nod tanks. In the meantime, a hotwire sneaks into the HoN dealing heavy perma. Both teams contest tunnels with their tanks. GDI gets the upper hand however and roll into Nod's base with offensive buff. GDI fails to deal perma damage, but completely wipes all of Nod's tanks. Nod pushes the tanks back with a assortment of AT infantry. As GDI pushes into the tank tunnel again, Nod gets a infiltration kill onto WF. GDI falls back with their remaining tanks to defend. GDI rushes into the HoN with 3 hotwires using defensive buff and kill it with remotes on the MCT. GDI proceeds to turtle heavily with their remaining tanks and pushes advanced infantry into the infantry bunker. Nod tries multiple tank and rocket rushes but they get spotted by radar scan spam. GDI gradually gets a VP advantage by leveraging higher tier infantry and defensive tanking. Nod eventually manages to kill most of GDI's tanks but not before GDI gets 3 heroics. GDI proceeds to rocket rush with the heroics and a few elites, dealing perma damage. Nod tries to light tank rush in response but ends up feeding GDI VP instead. A second wave of rockets finishes the job. Match 3: Tomb (Winner: Democracy - GDI) GDI rushes Nod's HoN through the tunnels. GDI suicides to defend but abandons the harvester battle. GDI secures their harvester and Nod loses theirs. Nod still pumps out Arties and Lights to the field first, pressuring GDI's Ref and PP. Meds roll out to push Nod back. GDI pushes Nod back on Silo route but is unable to displace Nod from the Tiberium side. Nod forgets about defending and the HoN explodes from infiltration. Whoops. GDI pushes Nod's tanks back and rolls in. The rest of Nod's base explodes. Match 4: Islands (Winner: Xeon - GDI) Nod starts with a classic Arty rollout. GDI contests with Gunners/MRLS/APC. Nod takes a few losses but manages to push through GDI's forces and pressures the Ref. GDI starts to get Meds. Nod pushes up and shells the WF, dealing perma damage. Nod locks GDI in with a Flamer and pounds Ref again, dealing perma damage. GDI manages to breakthrough Nod's lockdown and pushes field with infiltration distracting Nod's reinforcements. GDI transitions into mass Mammoths. Field control goes back and forth a bit but GDI gradually pushes to Nod's side of the field. Nod pushes GDI back using a mix of tanks and AT infantry. Nod manages to gather Arties and buff before GDI can push Mammoths out of the base. They deal heavy perma damage to GDI's Ref. GDI counter pushes and buffs, also dealing heavy perma to Nod's Ref. Infantry infiltration pressure keeps Nod away from the field, letting GDI get easy field control. Nod opts to try their own infiltration. Nothing happens. GDI continually sends waves of tanks to Nod's front, getting armour breaks onto Air and Ref. Nod eventually decides to abandon field to Mendoza rush through the tunnels. GDI counter pushes with their tanks, killing all of Nod's base before the Mendozas can kill Barracks. Player list from Minji's stream: Solid tanking from my team. Not so much on the defense. Complete opposite it appears on team democracy funnily enough.
-
Sat 17/11 GDI PUG @Xeon Wraith (3) vs @Madkill40 (1) Match 1: Field X (Winner: Xeon - GDI) GDI starts with a delayed grenadier rush, which dies horribly. GDI then tries to divert their efforts to Harv but forced back by buggy support. Nod secures their harvester and GDI loses their harvester. Twice. Nod starts rolling out Lights and Arties, GDI with a single MRLS. Nod doesn't really do much for a few minutes, allowing GDI to start rolling out Meds. GDI proceeds to contest outer route with the Meds but is unable to break through their repairs. @TONY-STARK then airstrikes their tanks, allowing GDI Tanks to clean up and push to control the field. Nod abandons field control for a joint Stank rush on AGT and Mendoza rush on Bar. GDI gathers up and offensive buffs with their entire tank force at the same time. GDI takes heavy perma damage on Bar but kills HoN outright in exchange. Nod tries a follow-up rocket rush on Bar with a few Stanks hitting WF. The rockets gets spotted early and repairs are able to get to Barracks before a armour break. GDI pumps tanks out in the meantime, taking field control. Nod tries to amass Stanks. The vehicle dropoff gets scouted and GDI buys a mammoth to defend. The stanks hit AGT but gets quickly cleaned up. Eventually GDI rushes in with smoke cover, killing Ref and Air. The rest of Nod's base falls shortly after. Match 2: Cliffside (Winner: Madkill - GDI) Both teams secure harvester, though GDI uses a delayed start. Nod goes Arty/Light with GDI with MRLS/Meds. Nod gains control over the tunnels and starts shelling WF and Bar with arty fire. Nod infantry infiltrate the Refinery at the same time, killing it with no resistance. On the flipside, a hotwire sneaks into the HoN killing it. GDI starts to pump Mammoths into the tunnels and Nod pumps Arties and flamers in response. Tunnel control exchanges back and forth but eventually the sheer mass of mammoths overpowers Nod. With no advanced repairs, Nod is forced to commit nearly all of their players to try and hold GDI's mammoths back. Meds secure outer route control. With no ability to flank repairs, no infantry EMP and tunnels blocking commander EMP, Nod is unable to kill the mammoths fast enough to gain any meaningful control. GDI pummels Nod's buildings switching between and dealing perma damage on everyone. GDI gets a second infiltration kill on Nod's Ref and Nod decides to do a last ditch Stank rush through the outer route. GDI rushes in response. Nod manages to pull off a kill on AGT but GDI ends the game before Nod can do more. Match 3: Crash Site (Winner: Xeon - GDI) GDI gets the early silo. Nod rollouts Arties, GDI with Meds. Both teams contest the field for a while, but Nod manages to push GDI back with a Flamer and Titan support. Nod locks GDI in, but a Hotwire manages to get heavy perma damage on Air. Nod shells GDI's base but is unable to get signficant damage off. Eventually GDI stacks enough tanks to kill the Flamer and GDI breaks the siege. While GDI pushes field, a Mendoza sneaks by Ref and deals heavy perma damage by shooting the MCT from the outside. Field control goes back forth. Nod manages to push up to GDI's base again, buffing and dealing heavy perma to GDI's WF. GDI amasses Mammoths in response and pushes Nod back. They buff and kill Airstrip. Nod tries to rocket rush through the tunnels, but this gets called out early and blasted apart with MRLS. GDI tries to push tanks again but is held back by tons of AT infantry. Nod tries a second rocket rush, this time going to the hill by the abandoned WF. This gets spotted by Radar Scan and shut down. GDI tries a APC rush to PP but this fails. Nod tries a Chem rush through the tunnels, once again being spotted by Radar Scan. GDI uses this opportunity Ions the HoN and tanks pummel it at the same time. The HoN dies with little resistance and so does the Ref. Nod tries a assortment of infantry rushes, which are continuously called out or scanned. GDI in the meantime forgets the HoN is dead and does nothing for a while. Whoops. Eventually someone points it out and GDI tanks kill off the PP. Match 4: Walls (Winner: Xeon - Nod) Nod loses their harv and GDI secure theirs. GDI tries a humvee surf, but this gets scouted out early. The humvees meet a wall of remote C4 and a stopped harvester and explodes. Nod rollouts with a Arties and some SBHs. This deals a signifcant amount of perma damage to Ref. The Arties get cleaned up and GDI secures plateau control with Orcas and Sydneys. Nod continues to try to rush with SBHs but loses field control in the process. The SBHs fail and efforts are redirected to the field. Nod manages to mass a couple Apaches and they take control of the plateau with LCG and Sakura support. The Apaches begin to pressure GDI's repairs and force their tanks back. Arties move up and they finish off the Ref. Nod gathers Apaches and chinooks and rushes the WF while nuking PP. The WF gets a armour break from outside C4 and the nuke kills the PP at 0%. Nod amasses Apaches and rushes in to finish the game. Player list from Minji's stream: Some pretty amazing scouting and callouts this game. Huge credit to @LavaDr4gon for calling out so many of them.
-
Sun 11/11 NOD PUG PART 2 @Xeon Wraith (2) vs @Whistle(2) Match 1: Complex (Winner: Xeon - Nod) GDI gets early control over the silo and tries to run to Air. They get intercepted and nothing really comes of it. GDI starts to buy MRLS/Meds, with Nod rolling out a mixture of Arties, Lights and Flamers. GDI all-ins on the silo side but Nod goes for a split between both sides. A call out from a scouting tank tells Nod about their undefended side by Barracks and tanks rolls in uncontested. The Barracks dies. GDI tries to mass tanks again on the silo side, but with Nod tanks rolling into their base and no hotwire support, the push fails. Ref and WF get shelled down. Match 2: Volcano (Winner: Whistle - Nod) Nod loses their harvester and GDI secures theirs with a delayed start. Barracks gets dealt heavy perma damage from infantry infiltration however. Nod rolls out arties, GDI with Meds. GDI puts pressure on the tiberium cave but Nod AT infantry in the tiberium cave keeps GDI's tanks from securing it. Nod is held at bay thanks to MRLS fire. Nod sniper overwatch prevents GDI from pushing too far however. Stalemate continues for a while with both teams getting occasional armour breaks. Eventually GDI manages to gather a Mammoth and two Meds inside on the Tib cave and they push in with offensive buff, killing PP and dealing perma to HoN. Nod quickly counter rushes with a offensive buff, scoring kills on PP and Bar while GDI tries to restock. Nod's tanks get cleaned up but Infantry manage to also kill GDI's ref. GDI tries a couple of pushes but ultimately falls. Match 3: Whiteout (Winner: Xeon - Nod) Both harvesters die. Twice. Nod goes with super sneaky surprise Arties to the hill, GDI with Rockets, Gunners and MRLS to contest. The hill takes a while to clean out but Nod does so before GDI can push Meds. Arties start shelling GDI's buildings taking down WF first. GDI manages to get a few tanks during this but are unable to push Nod off the hill. The arties shell the rest of GDI's base to death. Match 4: Snow X (Winner: Whistle - Nod) Nod runs into GDI's base and GDI shoots at them. This continues for a while. Eventually Nod rolls out Arties and GDI with Gunner/Meds. Tanks goes into the tunnels. Teams switch control over the tunnels occasionally but are only able to provide tiny bits of building pressure before being forced back. The Barracks then decides to explode. GDI tries to rush through with the vehicles they have and then get stuck in the tunnels. Nod buffs and WF explodes. Player list from Danvik's Youtube:
-
So its been a few weeks since this feature has been implemented so I thought I'd start up a thread to discuss it. For those unaware, the MRLS is capable of locking their turret in a fixed front-facing position by pressing Space. Locking the turret in-place allows players to curve the missiles of the MRLS to some extent. The most exploitative application of this is to curve the missiles around cover, allowing MRLs to kill off vehicles and repairs from safety. A demonstration of this can be seen in Danvik's recent PUG video on Field (27-10). The MRLS "missile loop" can be done on most maps with a suitably short wall. High walls such as the ones on Under are too high for the loop to do practical damage. The use of the MRLS missile loops on Field is pretty controversial among (at least) PUG players, as Nod tanks have little means to retaliate. However, this is probably the most unfair use of the missile loop - at least from my testing. Other notable uses of the missile loop are on maps like: Islands, Tomb, Canyon and XMountain - all of which are considerably more open than Field's small vehicle choke point and less of a issue. My opinion: MRLS looping should be removed on Nod's side of Field (Probably by just increasing the wall height). On the whole, I'm personally quite a fan of the new addition. From a competitive standpoint, MRLS missile loops provides a soft-counter to the extremely potent Flame Tank lockdown Nod gets on some maps. MRLS themselves are still quite brittle and are terrible against any aggressive push by Nod tanks, so GDI can't rely the MRLS to push for field control. This allows for some more interesting tank fights over field control and gives GDI a bit more diversity to their typical Medium Tank heavy rollouts. I would imagine this also gives some pretty interesting map design options. Canyon is pretty decent example of one - though unintentionally. On that map GDI is able to missile loop around the front of their base to combat the typical Flame Tank lockdown but can't use it to fire into Nod's base. Balance aside, the MRLS is a fairly clunky vehicle to use and just having a bit more control of the MRLS turret just kinda feels nice. Thoughts?
-
No writeup of last week (3rd & 4th), been busy. You can check out the videos of it on Minji's, Gliven's or Danvik's videos. Sat 10/11 NOD PUG XeonWraith @MintLemonade (1) vs @boxes(2) Match 1: Walls (Winner: Boxes - Nod) GDI loses first harvester and Nod secures theirs. GDI does get early plateau control with basic infantry, which pushes back Nod's early arty rollout. The infantry gets cleaned up once Nod rollouts Apaches. GDI responses with a rollout of Meds with a few Orca. GDI overcommits on the Meds and is unable to contest plateau in sufficient numbers. GDI gradually gets pushed back and Nod sieges with arties. Arties do some perma damage to the Ref, but gets cleaned up with aggressive pushes by GDI. Nod eventually decides to amass Apaches. Nod buffs and rushes into GDI's base despite having both AA towers up. GDI doesn't have enough firepower however, and GDI loses their PP. Nod restocks Arties and kills the Ref with little contest. GDI tries a desperate Med rush which is unable to deal significant building damage. GDI surrenders. Match 2: XMountain (Winner: Mint - Nod) Nod rolls out Lights and Arties and locks GDI in before they can amass Meds. GDI does manage to clean the majority of the light tanks however and pushes Nod back. Nod's backline arties whittles down GDI's tanks from a distance eventually allowing Light tanks to take point, locking GDI back in. Nod also starts using LCGs and EMP strikes to force GDI further back, allowing arties to push up and shell GDI's ref. GDI eventually cleans up the front light tanks and pushes back out. This repeats a couple of times, till Nod is able to kill GDI's ref. Nod continues the tank pressure and kills the PP with a nuke. The rest of GDI's base dies soon after. Match 3: Field X (Winner: Boxes - Nod) Both teams lose harvester. Nod gets the early Arty/Light rollout, while GDI is forced to donate for Meds. Nod neglects to support their tanks with sufficient repairs which allow GDI's Meds to roll over Nod's tanks with a defence buff. GDI pushes toward Nod's side of the field but is unable to push sufficiently to deal building damage. Nod gradually transitions into Stanks. This does allow GDI push enough to buff up and deal perma damage to HoN but Nod' stank rush catches GDI off-guard and kills the WF and deals heavy damage to AGT. GDI turtles up and tries to rush through tunnels with infantry. Nod also ups their tunnel defence and GDI is unable to deal damage to Nod's buildings. With little options available, GDI decides to throw in the towel. Player list from Minji's Stream:
-
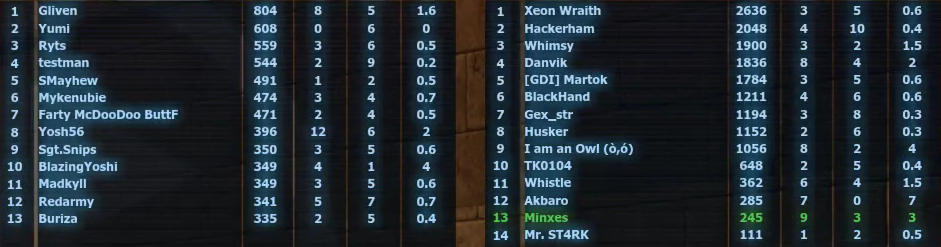
Sun 28/10 @Gliven (3) vs @blazingyoshi (2) Match 1: Complex (Winner: Gliven - GDI) Nods rolls Arty/Lights. GDI pumps Meds. Nods gathers a large amount of Arties on the silo side but neglects to control the rest of the field and get sufficient repairs. GDI rolls in Meds, which kills the majority of Arties. Nod tries to restock on Arties and Lights but GDI keeps pumping Meds into the base. Turns out, GDI tanks are individually stronger than Nod tanks. GDI places pressure everywhere, until Nod eventually gives in and the Air dies. Ref and HoN soon follow. Match 2: Arctic Stronghold (Winner: Gliven - Nod) Nods rolls Arty/Lights. GDI pumps Meds. Some tanks slug at each other at range on the tiberium side, others push in to contest the EMP cannon. GDI wins the initial fight, but their repairs get picked off by enemy snipers. Nod resecures the EMP but is pushed back by a wave of restocked GDI tanks. The cannon remains contested for a while but GDI is unable to break through their repairs. Eventually GDI decides to Gunner rush with two mammies holding back Nod. The rush fails to deal significant building damage. In the meantime Nod's Arties by the tiberium field sieges the AGT and the Arties at the EMP cannon shells WF and PP. GDI tries to push mammies to the EMP cannon but is locked down by Arty fire. Once again, GDI is unable to burst through Nod's repairs and the push fails. Nod sieges GDI till the AGT dies and the rest of GDI follows suit. Match 3: Mesa (Winner: BlazingYoshi - Nod) Nod secures their Harvester and kills GDI's Harv. GDI preps for a early Humvee rush but it is called out as the vehicles are brought. The Humvees go to HoN and PP through the center cave. PP gets cleaned up, but HoN suffers heavy perma damage (~3% HP) despite the call out. Nod pushes Arty/Light, GDI with Meds. Nod overruns the outer route, killing GDI's harvester repeatedly. The cave is contested, but is gradually cleaned up with tank support from the outer route. Nod pressures WF/AGT from the cave and PP/Ref from the outer route. GDI masses their Meds and pushes with a offensive buff through the cave. The tanks fail to deal significant damage but infiltration of Nod's PP and Air gets a armour break before clean up. Nod restocks tanks and continues to siege GDI. GDI tries to Gunner rush but Nod kills the PP, Ref and WF while their team is away. The Gunners deal significant perma damage on Nod's Ref but fails to kill. GDI tries for a second wave with more Gunners but is scouted early. The Gunners fail to kill the Ref and GDI's base explodes. Match 4: Islands (Winner: Gliven - Nod) Nod rolls Arties and GDI pushes gunners with Meds to follow up. The Arties siege the Ref but is pushed back by Meds and a lucky flamer crate drop. The flamer overextends and dies, taking most of GDI's repairs along with it. Nod pushes back out with Arties and a flamer and secure the field. GDI gets distracted by a technician in the Ref and fails to restock on tanks. Nod buffs the Arties and shells GDI's ref. GDI tries to push the arties back with a couple of Meds with no success. The Ref dies. Nod rolls in and cleans up a short while after. Match 5: Field X (Winner: BlazingYoshi - Nod) Nod secure their Harv and kills GDI's Harv. GDI grenadier rushes in response but it gets spotted thanks to Comm centre early and shutdown. Nod pushes Arties and lights to the field and GDI tries to contest with Meds and MRLs. GDI is unable to mass sufficient tanks and gets locked in base. Nod's arties siege up GDI's WF and AGT. Arties splash repairs inside the AGT through the open door, eventually killing it. GDI buffs and counter pushes. Nod's arties ignore the push and opt to kill GDI's Ref instead. GDI's push gets nullified and Nod rolls in more tanks to finish GDI. Player list from Minji's stream: A couple of tanking slip ups from team BlazingYoshi but seriously fuck team gliven's field repairs like holy shit why wont you die god damn it. Also shoutout to BlazingYoshi keeping a cool head during his first time commanding today. GJ!
-
You can still do this. Choosing the same free character may not refill health but it does refill ammo. Funnily enough, this was one of the defense tactics that was discussed in the Squad War, though we never implemented it.
-
Sat 27/10 @Xeon Wraith(2) vs @MintLemonade/@yosh56(3) Match 1: Walls (Winner: Mint - Nod) Both harvesters survive. Nod rolls out two early buggies. Nothing comes of it though. GDI rolls out MRLs, Meds and Orcas, Nod with Arties and Lights. GDI secures early plateau control, pressuring Nod's base. GDI notably gets a armour break on HoN, but eventually gets pushed back by Nod tanks. GDI attempts to gather Orcas to rush the HoN but fails to amass more than 4. The Orcas gradually get picked off by enemy infantry and Apaches, losing plateau control. GDI then buys 3 Mammoth tanks (???). The mammoth tanks become VP feed for Nod. Nod consolidates plateau control with LCGs and lock GDI in their base. GDI gets pounded with arty fire and loses the Ref. GDI is unable to break out of the siege and dies. Match 2: Whiteout (Winner: Mint - GDI) Both harvesters die. Nod rolls out Arties. GDI pushes with rocket/gunners and two Humvees. Arties move out too early with minimal repairs and quickly get killed off. GDI transitions into Meds and locks Nod in base. GDI buffs and kills Air. Nod tries to push back with LCGs but with no economy and no vehicles,, Nod is unable to make a meaningful difference. Nod dies. Match 3: Field (Winner: Xeon - GDI) Nod's harvester dies and GDI lives with a delayed start. GDI pushes MRLs and Meds while Nod has to make do with Arties. The Arties get shelled by GDI and locks Nod in their base. GDI slowly builds up their tank force eventually pushing with a offensive buff. It fails but Nod is unable to break out of GDI's lockdown. GDI sieges Nod for a while, using Mammoths for point holding and MRLs to pick off repairs behind cover. A second defensive buff push works and kills off the Obi. A second wave of tanks and infantry kills the Ref and Hon and Nod crumbles. Match 4: Tomb (Winner: Xeon - Nod) Both harvesters survive. Nod pushes out with Arties and Lights and most of GDI apparently decides to go AFK. Simultaneous tank pressure from both sides causes breaks in both Ref and PP. Eventually Ref falls and the few tanks GDI has get cleaned up. The rest of GDI gets cleaned up shortly after. Match 5: HeXMountain (Winner: Yosh - Nod) Both harvesters survive. GDI notably gets a couple of infantry inside the HoN but no damage is dealt. GDI pushes out with MRLs/Meds, Nod with Arties/Lights. GDI's barracks gets infiltrated by three Nod infantry and it explodes. GDI tries to push tanks still but are unable to sustain them without advanced repairs. Nod locks GDI in base with vehicles. With no higher tier infantry and generally weaker infantry players, GDI loses their infantry rush options as well. GDI gets pummeled to death. Player list from Minji's Stream: A fairly sloppy start with my team with a lack of vehicles and repairs but gradually improved over the course of the PUG. Then @poi came and the Barracks exploded ¯\_(ツ)_/¯
-
Sat 20/10 @Redarmy (1) vs@Madkill40/ @yosh56/@MintLemonade (3) Match 1: Cliffside (Winner: MYM - GDI) Nod wins the early harvester battle and pushes out Arties and Flamers on both sides. Nod locks GDI in on both sides but gets pushed back by AT infantry and Meds. Both teams duke it out with vehicles for while. Eventually GDI gets a infiltration kill on HoN and Nod collapses shortly afterward. Match 2: Arctic Stronghold (Winner: Redarmy - GDI) Both harvesters survive, but Nod gets control over the silo. Nod rolls Arties/Lights, GDI MRLs/Meds. GDI pushs to control the EMP Cannon with a few tanks to contest the tiberium field. Nod does the same but loses the EMP fight. GDI tries a couple buff rushes with the tanks at the EMP cannon but are unable to deal perma. Nod attempts to sneak tanks on the lower path but are caught by the tanks around the EMP cannon. Eventually GDI amasses Mammoths and rushes the Obi with a offensive buff in classic GDI fashion. Nod gets overwhelmed by GDI's tanks afterward. Match 3: Walls (Winner: MYM - GDI) GDI wins the Harvester battle, killing Nod's Harv and saving theirs. Nod rolls out Lights, GDI pushes Orcas and infantry. Nod sends a SBH squad to kill the AA towers. Tony enters the game and joins the SBH squad for some reason. Nod tries to push Apaches but is unable to fully push GDI off the plateau. Eventually GDI sneaks into HoN and kills it. Nod tries a Apache rush and a Stank rush but fail to do any meaningful damage. GDI rolls tanks in and Nod falls. Match 4: Tomb (Winner: MYM - Nod) Both teams save their harvesters. Nod rolls Arty/Flamer, GDI rolls MRLs/Meds. Tank fight ensues, until the Barracks explodes from infiltration. GDI does their best pushing tanks still, but can't sustain them without advanced repairs. GDI bleeds out. Player list from Minji's stream: Some resource mis-management on Team Redarmy notably on Uphill, where we had Anti-infantry within the cave while GDI was pushing PICs on the other route. Main issue without a doubt was the lack of a defender though. The three losses all had infiltration building kills which crippled the team. SUNDAY PUG 21/10 @Xeon Wraith (2) vs @Fffreak9999 (0) Matchs : Under (Winner: Xeon - GDI) / Islands (Winner: Xeon - Nod) Basically, team Freak has a really bad time. Player List from Minji's stream:
-
SUNDAY PUG HYPE 14/10 @TK0104 (3) vs @boxes, then democracy (1) Match 1: Field (Winner: TK - GDI) Pretty standard game. Nod rolls Arty/Lights, GDI rolls MRLs/Meds. GDI wins the tank fight and locks Nod in their base. GDI pounds Nod with tanks till they die. Match 2: Tomb (Winner: TK - Nod) GDI tries a starting infantry rush to HoN but fails to do damage. Nod kills GDI's harv and rolls out Arties. A bit of a tank slugfest ensues, but ultimately GDI is unable to pump enough tanks out to push Nod back. Boxes has to leave during this match, letting democracy take over. Match 3: Field X (Winner: Democracy - Nod) Both teams start with delayed harvester rollouts. GDI secures their tiberium field first and gets their harvester dump. Nod rolls Arty/Lights, GDI rolls MRLs/Meds. DEJA VU Tank slugfest goes back and forth, till GDI decides to rocket rush. The rush deals heavy perma to HoN but loses field control in the meantime. GDI restocks tanks and pushes back Nod. Eventually Nod slips a stank rush past GDI, taking down the AGT. GDI tries to take out the HoN in response, but lacks the DPS to do so. GDI tries a mixture of Tank pushes and rocket rushes to finish the HoN but permanent repairs keep it alive. With this, Nod then opts to abandon field control for a while to Mendoza rush the Bar. It works and kills the Bar and also Ref. GDI tries some last-ditch tank and rocket rushes, this time targeting Ref but is unable to deal perma. GDI crumbles afterward. Match 4: Twilight (Winner: TK - Nod) Basically, Nod gets Flame tanks on this incredibly small and tight map and rolls over GDI. Player list from Minji's stream:
-
I dunno about that. Team Yosh did have people defending the base (you can see on Minji's stream) but there just wasn't enough of a response to counter our rushes. The only time there was was on Mesa, where their team was still in their base. The only way I can see of really stopping the rushes would have been to call it out earlier.
-
PUG 13/10 TL;DR: A ton of dumb early game rushes ending the match. Most "standard" game was probably Whiteout which was still pretty one-sided on the tanking front. Not too sure what Team Yosh was missing role-wise, though more scouting definitely would have probably helped. @Xeon Wraith (5) vs @yosh56 (0) Match 1: Uphill (Winner: Xeon - Nod) Team GDI goes heavy into the field, causing Nod to stop their harvester. Meanwhile Nod walks into GDI PP. GDI gets too greedy and tries to advance to the stopped harvester instead of suiciding to defend and loses their PP. Nod rolls out tanks to pressure GDI but is eventually pushed back with Gunners and Meds. Infantry on the hill bridge pressures GDI's repairs and the second Nod tank wave cleans up. GDI's crippled economy stops them from restocking tanks and the Base falls with a offensive buff push. Match 2: Lakeside (Winner: Xeon - GDI) GDI goes for a pretty balanced infantry spread. Majority of Nod tries to rush the Bar via high route but gets spotted. A couple of GDI infantry on the lower inf path runs into HoN at the same time. Neither team manages to get any significant damage. GDI does manage to C4 and kill Nod's Harv, which Nod was unable to do to GDI. With the Harvester secured, GDI preps for a grenadier rush during the downtime with @boxes scouting ahead. @Ryz gets abducted by aliens. GDI runs into the HoN while Nod tries to rolls tanks into the field. GDI's rush goes mostly uncontested and grenadiers start running to Ref as well. HoN explodes, but GDI manages to save Ref at 47% HP. GDI tries a quick followup Chinook rush but forgets Nod has no HoN and packs an extra Sydney for no reason (was for the mines). The rush fails to deal perma damage. GDI amasses tanks on the field while Nod setups a Rocket rush and Stank rush. Nod's Rockets move out, prompting GDI to offensive buff and push in. GDI kills the Ref, Nod's rockets fail to deal perma. The Stanks go undetected and hit WF, but are unable to kill it. Nod tries to sneak Stanks again while GDI restocks on tanks and pushes field. Orcas spot the Stanks and GDI rolls tanks in. The Stanks get cleaned up and the rest of Nod follows. Match 3: Mesa (Winner: Xeon - Nod) Team Yosh accidentally thinks Mesa is Mesa X. Nod tries a stupid flame rush to GDI's PP, but it gets spotted and shutdown. GDI tries Gunners but it gets scouted and shutdown. Nod then gets Arties and a Flamer and GDI dies. ¯\_(ツ)_/¯ Side note: One of the biggest factors Mesa is Nod sided is due to how trivial it is to shutdown GDI's tanks with a Flamer. Adding more rocks to the map may affect Arty siege somewhat but it does provide even more cover for Nod tanks to exploit. Think of Field X - you hardly ever see Flamers or arties in the center of the field since there's no cover to use. Match 4: Whiteout (Winner: Xeon - GDI) Nod stops their Harv and tries to kill GDI's Harv. GDI holds Nod back and saves their Harv. Nod's Harv goes later but is mostly uncontested. Nod goes standard fare Arty party and GDI rolls Meds with some additional infantry to pressure repairs. The Meds wins out and Nod starts to gather stanks. The Stanks fail to do perma and GDI box Nod in with tanks. HoN falls after a offense buff and a infiltration and Nod' base follows shortly after. Match 5: Walls (Winner: Xeon - Nod) @MintLemonade declares he needs to leave for work in 15 minutes. Nod subsequently decides to buggy surf after the Harv battle. Both Harvs die. GDI commits to defending their second harvester, leaving the buggy surf undetected till it enters GDI's side of the field. The buggy surf dukes past PP and kills off GDI's Ref. Nod tries a Mantank drop after but with no luck. Meanwhile SBHs clear out GDI's AA towers and Nod goes for the typical Apache stack. GDI tries to mass their own Orca rush as well. Nod rolls in first with a offense buff and SBH nuke, killing the Bar and WF. GDI opts to ignore the Apaches and counter rushes. Nod then immediately diverts the Apaches after killing the Bar to intercept GDI's Orcas. GDI's orca rush gets shutdown before a armour break. GDI crumbles afterward. Match 6: DECK Is Deck. Everyone wins. Player list (from @Minji's stream): Heads-up: We'll be trying to restart Sunday PUGs this week, also at 7PM GMT. If you can't make the Saturday PUGs or just want to play more, chill in the PUG waiting room and we can try to get some games running.
-
PUG 6/10 @Xeon Wraith (4) vs Democracy, but mostly @yosh56 shouting (0) Match 1: Field (Winner: Xeon - GDI) Both teams go for harv with no success. Nod tries a rocket rush to Bar, GDI grenadier rushes Ref at the same time. Both teams get a fair amount of perma-damage, with GDI dealing a bit damage over Nod. Nod then rollouts out with the standard Arty-Flamer to try to lock GDI in. Thanks to saving Harv and the delayed rollout, GDI pushes Meds at the same time as the Arties. @MintLemonade notably pulls an early mammoth tank thanks to perma damage credit income. Nod's tank force is unable to acquire a decent field position in time and is pushed back to their base entrance. Nod holds GDI off with a mixture of tanks and AT infantry but is unable to push further. Eventually GDI defence buffs through Nod' EMPs and kills the Ref. A follow up tank rush kills the Obi and Nod crumbles. Match 2: Uphill (Winner: Xeon - Nod) GDI goes for silo and harvester. Nod gets lost in tunnels. Nod harv dies. GDI rolls Meds over Nod Arties and takes field control. A random duo (?) nuke kills off GDI's PP. In the meantime Nod manages to push GDI off the field with lights and arties. Nod locks GDI in their base and shells them to death. REBALANCE: (Team Xeon) Owl & Voltex swapped for (Team Yosh) MyKenubie & Whistle Match 3: Islands (Winner: Xeon - GDI) Standard fare Arty rollout vs Gunner counterpush. GDI rolls Meds and pushes Nod back but is unable to sustain it. Nod regains field control and locks GDI in with a flamer. Arties pound the Ref and WF, dealing heavy perma-damage to Ref. @Quincy in classic fashion, sneaks and kills the HoN. GDI restocks on tanks and pushes through the Nod siege. Lack of advanced reps causes Nod tanks to crumble, letting GDI have total field control. Nod's base explodes soon after. Match 4: Walls (Winner: Xeon - Nod) Harv battle ends with no losses. Both teams small preliminary tank forces to contest field. GDI starts getting orcas but Anti-AA tower SBHs keeps them from pushing field. Nod maintains plateau control with LCGs and transitions to Apaches to counter Orcas. A second arty force starts massing on the North side. Nod rushes in with a buffed force of Apaches to Barracks but is unable to break armour. Meanwhile the Arty force pounds the Ref dealing significant perma damage. Arty and Apache pressure allows some Nod infantry to sneak into the WF and GDI is unable react in time. WF dies. The Arty force (which is still largely unharmed) gathers and kills the GDI Ref. After a couple minutes wait for CP, Nod masses LCGs and Apaches and rushes Barracks, killing it. GDI PP falls a while after. Probably a more balanced PUG than what the results indicate. Both Uphill and Islands would have been a lot tougher if my team didn't secure the building kills so soon after losing field. Player list (from @Minji's stream)
-
This is all sounding a lot like the tank balance thread of a few patches ago. I haven't played this patch very much, so I can't comment on how much of the mammy related stuff is relevant though. Conjectures: > The strength of the mammy is probably more potent on public servers, purely due to the player count. As vehicle limits don't change with players, its a lot easier to get more repairs on each tank on a 64 player server than a 40 player server. I'm pretty sure LCGs can't produce net positive DPS against hotwire repairs so those additional reps would provide a pretty significant statistical advantage for GDI. Dunno about Raveshaw. EDIT: Apparently I'm dumb and can't read. According to Yosh, the LCG deals the same DPS as advanced repairs. This point is voided. Last PUG didn't have the best of player balance, so I'm not gonna consider that Tomb game as a indicator for small player games. > I don't really see the issue with tank damage vs infantry. Using high ground can reduce - if not completely remove splash damage from tanks (i.e volcano tib walkway). Granted, not all maps have high ground to use but I don't think increasing AT inf staying power is the right call to deal with these maps. Tank headshots are funny and I will reject all arguments for their removal regardless of how sensible they may be. > I'm pretty okay with decreasing the importance of the harvester. Most maps already have a siege point to farm VP to award teams that control the field. Stopping their harvester is a bonus.
-
PUG 15/9 @Xeon Wraith (2) vs @Madkill40 (3) Match 1: Islands (Winner Xeon - GDI) Nod pulls standard Arty rollout, GDI pulls Gunners to counter. Some anti-inf on Nod but they get wiped by a MRLs escort. GDI begans to rollout Meds & Mammies and eventually kills off Nod's ref with a offensive buff. GDI overextends and loses most of their tank force though. Nod exploits this and nearly kills off the Ref. SBH squad fails to finish the job. Slugfest in the field for a while, till Nod sneaks into the Bar. GDI buffs and rushes in response. GDI wins the base race. Match 2: Walls (Winner Xeon - Nod) Harv battle. Nod pretty much all-ins on killing the harv, GDI defends. GDI fails to save the harv and Nod rollouts Arties and LCGs onto the plateau. A 2 Man SBH squad kills off the AA towers while Nod pressures GDI. Towers go down and Apaches flyover and kill off GDI tank reps. GDI surrenders. Match 3: Field (Winner Madkill @yosh56 - Nod) Nod stops their harv and rushs GDI's harv. GDI commander has his internet nuked in the meantime. Nod kills GDI's harv and saves theirs. GDI rolls MRLs and Nod rolls Arties. GDI ends up overcommiting to MRLs and Arties shells through everything. Nod tanks farm VP and a couple of Nod inf hold tunnels. GDI bleeds out. Match 4: Arctic Stronghold (Winner Madkill - GDI) Nod rolls out Arties and Lights. Meanwhile Nod's Ref explodes due to infantry infiltration. Whoops. Nods tries a rocket rush but gets instantly spotted. Everything in Nod explodes shortly after. ¯\_(ツ)_/¯ Match 5: Goldrush (Winner Madkill - Nod) GDI tries a dumb rush to HoN. It didn't work. Tank slug fest ends in a GDI victory, pushing back Nod to their base. Bar explodes from infiltration. Whoops. Lack of Adv.Engies loses GDI field control and lack of high tier inf loses all inf path control. GDI bleeds out. Pretty good response tank-wise and a ton of field control focus on my team. Probably should have paid more attention to infantry and defense. So TL;DR: Blame @Agent
-
Base Defense: Getting rid of the current mining system seems like a pretty decent starting point. Exact implementation and balance of it probably deserves it's own thread to discuss though. Infantry: Not going to comment much about infantry but if you're thinking of adding new abilities, I'd suggest going more weapon/gadget based stuff - as opposed to 'press X to gain Y buff'. Mostly to avoid combat becoming a rainbow-coloured vomit of abilities. Vehicles: After Planetside, I'm not really a fan of the directional armour. It encourages holding orientations to reduce the damage from shots instead of trying to dodge them. The times when you do flank a enemy it turns into a point blank brawl to prevent enemies from re-orientating. I don't imagine this'll translate well to RenX's vehicle physics. Besides, RenX already has field repairs to encourage flanking maneuvers. Vehicle balance seem generally fine. APCs kinda suffer from being used only in the very early and very late game for infantry rushs though. Could probably do with a anti-armour buff, particularly for GDI for a early game tank option to hold field. It'd be kinda cool if you could sorta side-grade vehicles with augmented weaponry. Like additional specialisation for vehicles. Light tanks for example could get a burst fire cannon in exchange for armour and passenger slot to specialise it into total hit-and-run. Repairs: Any change to the repair rates is going seriously effect tank flow in general. Dunno exactly how it'll change. Might result in a heavier focus on having more field repairs to sustain a push. Might result in a shift to spamming rushs instead of taking field control (don't need sustain if you just all push in at once I guess). I'd be careful with it. Buy-able weapons: Like some have already mentioned, character/role specific buy-able weapons seems like a pretty good direction to take this in that wouldn't throw infantry balance completely out the window. Veterancy: Only issue with additional levels is the symbols & naming. It needs to be clear how much of a advantage or disadvantage a player against another rank. Game Modes: One idea that I've been mulling over is the idea of a King-of-the-Hill styled map with a superweapon tech building and regular base destruction. Current tech buildings provide relatively small advantages and aren't that heavily contested mid-game. A tech building that can permanently damage or outright kill a building after some duration of capture would give something very significant to fight over and hold. Such a tech building would probably need to be on some long path that makes pushing the enemy base difficult though. That way there'll be a decent opportunity cost which the opposing team can exploit.
-
@DarkSn4ke I can't remember what I said about choke points, though I do recall wanting better cover from snipers. That aside I'm generally sorta-ish barely okay with the current state of the field. I'm not okay with the constant threat of stanks being able to rush a building though. The distance GDI base entrances pretty much makes it impossible for a single defender to scan - let alone repel a organised stank rush. The large field makes it pretty trivial to hide even with GDI field control. The GT is heavily exposed and can easily be taken out by a few lights/stanks/arties. Considering stanks are able to hit GDI's buildings before the AGT can hit them makes base defense a non-factor as a deterrent. Since quite a few people enjoy the large field of Outposts, its probably a bad idea to change that. Increasing AGT coverage or reducing the distance/angles between GDI base entrances would be a decent alternative to help against stanks. Tightening up GDI entrance choke points (particularly on Barrack's side) would also work by make AT mining a lot more viable. Unspotted/ignored tank pushes of any form is a problem with a team and is not unique to Outposts. I don't see any merit in adding flying units. Get a humvee/buggy.
-
Let me preface this by saying it's perfectly fine to never get out of your vehicle as a rule of thumb, especially if you're a newer player who is still getting to grips with tanking in Ren X. However until you're able to argue the exact reasons for and against your actions you'll never be truly efficient. This post looks at some of those arguments and is intended for the more experienced players who are looking to further optimise their tanking. (Its basically a risk assessment, but with tanks.) Lets consider the basic reason why players advise not to get out of their vehicle. Vehicle might get stolen if empty -> Don't exit vehicle While this certainly solves the problem, it assumes the worst for all scenarios. Instead consider: How often is there a enemy nearby capable of stealing your vehicle? How much are you actually losing if it does get stolen? How much are you gaining if decide to get out anyway? If you can answer those three questions with "Often"/"A lot"/"Not much" then its clearly a terrible idea to get out. On the other hand, if you can in some way change those to "Unlikely"/"Not much"/"A Lot" then it wouldn't be entirely crazy to take the gamble to get out. Lets consider how to effect these questions. Risk reduction : "How often is there a enemy nearby capable of stealing your vehicle?" On Nod: Usually not very high. The only way GDI is able to steal your vehicle is to either kill you or walk up in plain sight. Still, its possible to reduce the chances further. Stay close to your vehicle to quickly re-enter to prevent death from most automatic weapons. Assumes you have enough health to react. Keep moving & use your tank as cover to reduce chance of death from one-shot. Constantly look around your tank to prevent chance of enemy sneaking up on you. Pretty obvious stuff, but it gets more interesting on GDI's side. On GDI: All risks and reductions on Nod's side also applies to GDI. In addition, we also have to consider SBHs. So, how close are SBHs to your tank usually? Well, we don't know. BUT! We do know that they aren't immediately around your tank since they'll be visible. This small distance gives us some crucial leeway in controlling the SBH risk. Only exit your vehicle for a VERY short amount of time (<3 seconds or so) so SBHs won't have enough time to react and run up to your vehicle. Shoot the ground next to you randomly so SBHs keep their distance. All risk reductions of Nod applies to GDI as well. Remember that you don't need to do everything all at once. Keep your exits short but often to maximise your efficiency. While isn't as necessary on Nod to have short exits, its not a bad idea to get in the habit of doing it anyway. Damage control : "How much are you losing if it does get stolen?" However much your tank is worth plus the damage the stolen tank causes. There isn't much too say about the price, but the damage the stolen tank can vary significantly depending on the scenario. All of this is secondary to the risk reduction section. If you cannot reduce the risk of it being stolen then consider these points to decide if it is worth exiting. Try to exit vehicles when next to superior allied firepower so they can react if it gets stolen. Don't be afraid of leaving fragile and low cost vehicles. Avoid leaving high-tier vehicles. Be less afraid of the consequences the lower health you have on your tank. A tank that is about to die poses almost no danger to your team. Maximising gain : "How much are you gaining if decide to get out anyway?" There is a ton of different scenarios and infantry combinations possible for this, many of which I can't do (since I have trash aim) but there are a few to highlight. Repairing your tank: Many players will think of this as just restoring health points initially, but I think its important to instead think of this as "increasing the amount of volleys you can take". For instance, a recruit Sydney will deal 100 damage to a Arty per shot. In a 1v1 scenario, increasing your health pool from from 101 HP to 199 gives you ZERO GAIN. Increasing your health pool from 99 to 101 on the other hand will literally double your effective health. Its a massive difference in gain and if done correctly, can give you the edge to keep your tank alive in fights. (ASIDE: At minimum I suggest you should be capable of taking two volleys in a fight. e.g: A Arty should never expose themselves to a Mammoth tank when they have less than half health) Disarming MCT C4/Beacon: It should be pretty obvious but saving a building is considerably more valuable than losing a tank. This does NOT mean you should exit your vehicle each time though. Check your map first, if you can't see anyone else coming to assist you only then exit. Throwing EMP: This provides a relatively small tactical advantage. It is very fast however, so there's little risk in doing so. Specific examples: For sake of completion, here a few more examples of how all of this works together. EDIT: Video examples! Linky. Repairing a vehicle next to the Guard towers on lakeside: Chance of it being stolen (ignoring spies) is zero. Damage and gain don't matter in this case. Exit. Repairing a Mammoth tank in GDI base on Walls: There is a relatively low amount of risk of the tank being stolen, especially if you actively follow risk reduction. On the other hand, there's a fair potential for damage and you're gaining pretty much nothing. Maybe a few seconds of your time. Do not exit. Disarming timed C4 on a Humvee: There's a high chance of the Humvee being stolen since you'll be unable to perform short exits as effectively to disarm the C4 in time. You're not really losing much from getting out though. Its only a Humvee and it'll die anyway if you don't get out. On the flipside, even if you do disarm the C4, you're only saving a Humvee. Either choice though is acceptable. Personally would attempt it. Repairing a solo Veteran 350 HP MRLS with recruit timed C4 on it: Relatively low chance of the vehicle being stolen if you short exit and fire missiles around. Potential damage is fairly significant since you don't have allies to react nearby. You are potentially saving the vehicle if you repair beyond 400 HP though. Use short exits. Repairing a 100 HP Medium tank while being shot at by a Light tank with a second Medium tank ally nearby: There's a high risk of the Medium tank being stolen, as you won't be able to deter SBHs at all. However, since your tank is on low HP, the potential damage it can cause is very low - probably firing 1 or 2 shells at your ally before it dies. The potential gain is very high, as you might be able to save your tank by out repairing the Light tank. Furthermore, if the enemy Light is greedy, you may be able to bait them long enough for your ally to kill them. Exit. (The above scenario is one of the most impactful cases where you seriously consider exiting. Worst case it remains a 1v1. Best case its becomes a 2v0. This scenario can also be extended to other combinations of tanks.) Repairing a 500 HP Light tank while dueling a 700 HP Medium tank on Outposts: You can't use the Light tank as cover that well so there is a fair chance of getting sniped. There's a pretty large potential of damage if the tank gets stolen as well. You're not gaining much, only 1-2 extra hits. Do not exit. However consider exiting in cover or on lower health, especially if you can force the situation into a reverse of the scenario above. Leaving a Flame tank by GDI's entrance on Field, with enemy Havoc on sniper perch above and Barracks dead. High risk. high potential damage to allies. Potentially high reward if they fall for the bait. Either choice. I wouldn't risk it personally.
-
@TK0104 You're able to hold off on Volcano pretty well by controlling the bridge in the tiberium cave. Arties are terrible anti-inf without splash so you'll be able pressure them with little return fire. Long side shouldn't have any issues with MRL barrages until you can get meds. Whiteout is usually just a mad rush to whichever team can get field control first, be it arties or MRLs and gunners. If GDI can last long enough to push out mammies, they can start to farm arties being dropped off at the end of strip. Also note that the Volcano and Whiteout games today, GDI lost both of their harvesters and Nod secured theirs. They're a heck of a lot early game focused than most other maps but I wouldn't say the outcome of them is set. Except Mesa. Mesa is fucked. Edit: So the dumb Mesa anti-flamer strat I talked about in my previous post was to use a two man flaming C4 humvee to try and instagib the early flamer. The flamer usually sits around the corner so there's little leeway for the flamer to kill the C4 before it reaches them. Its also theoretically cost effective at 350 vs 800.
-
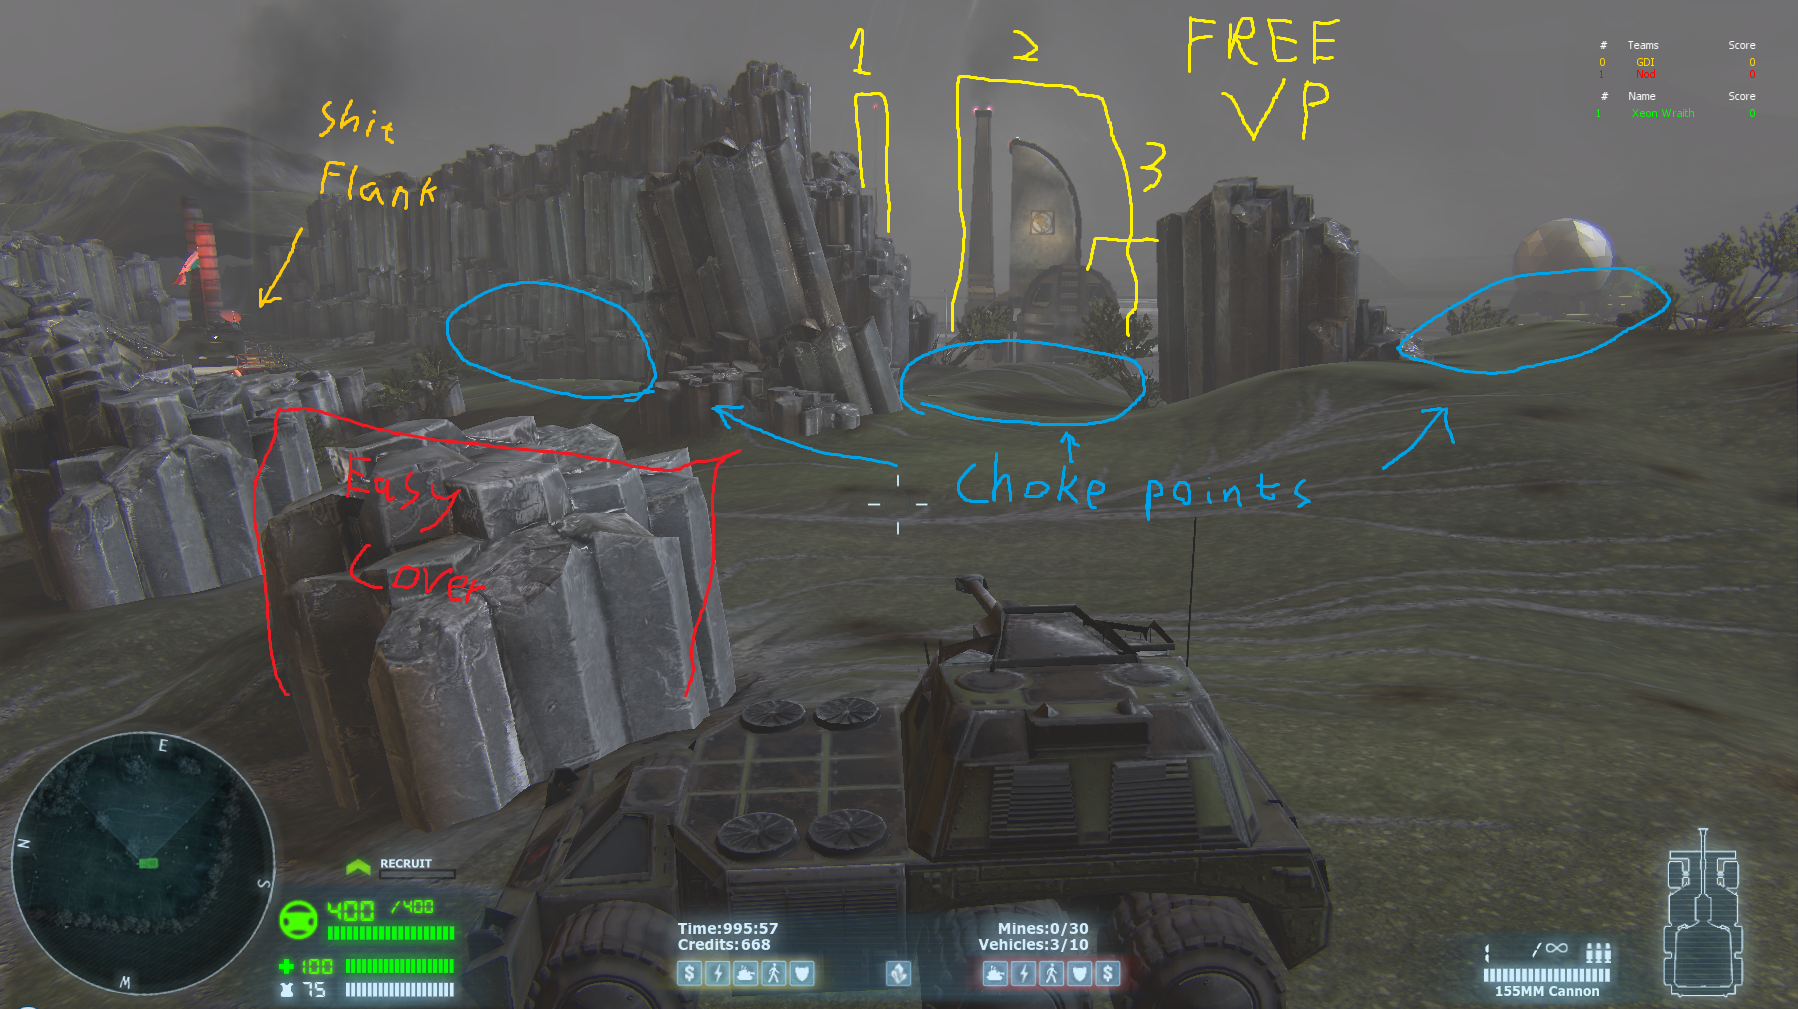
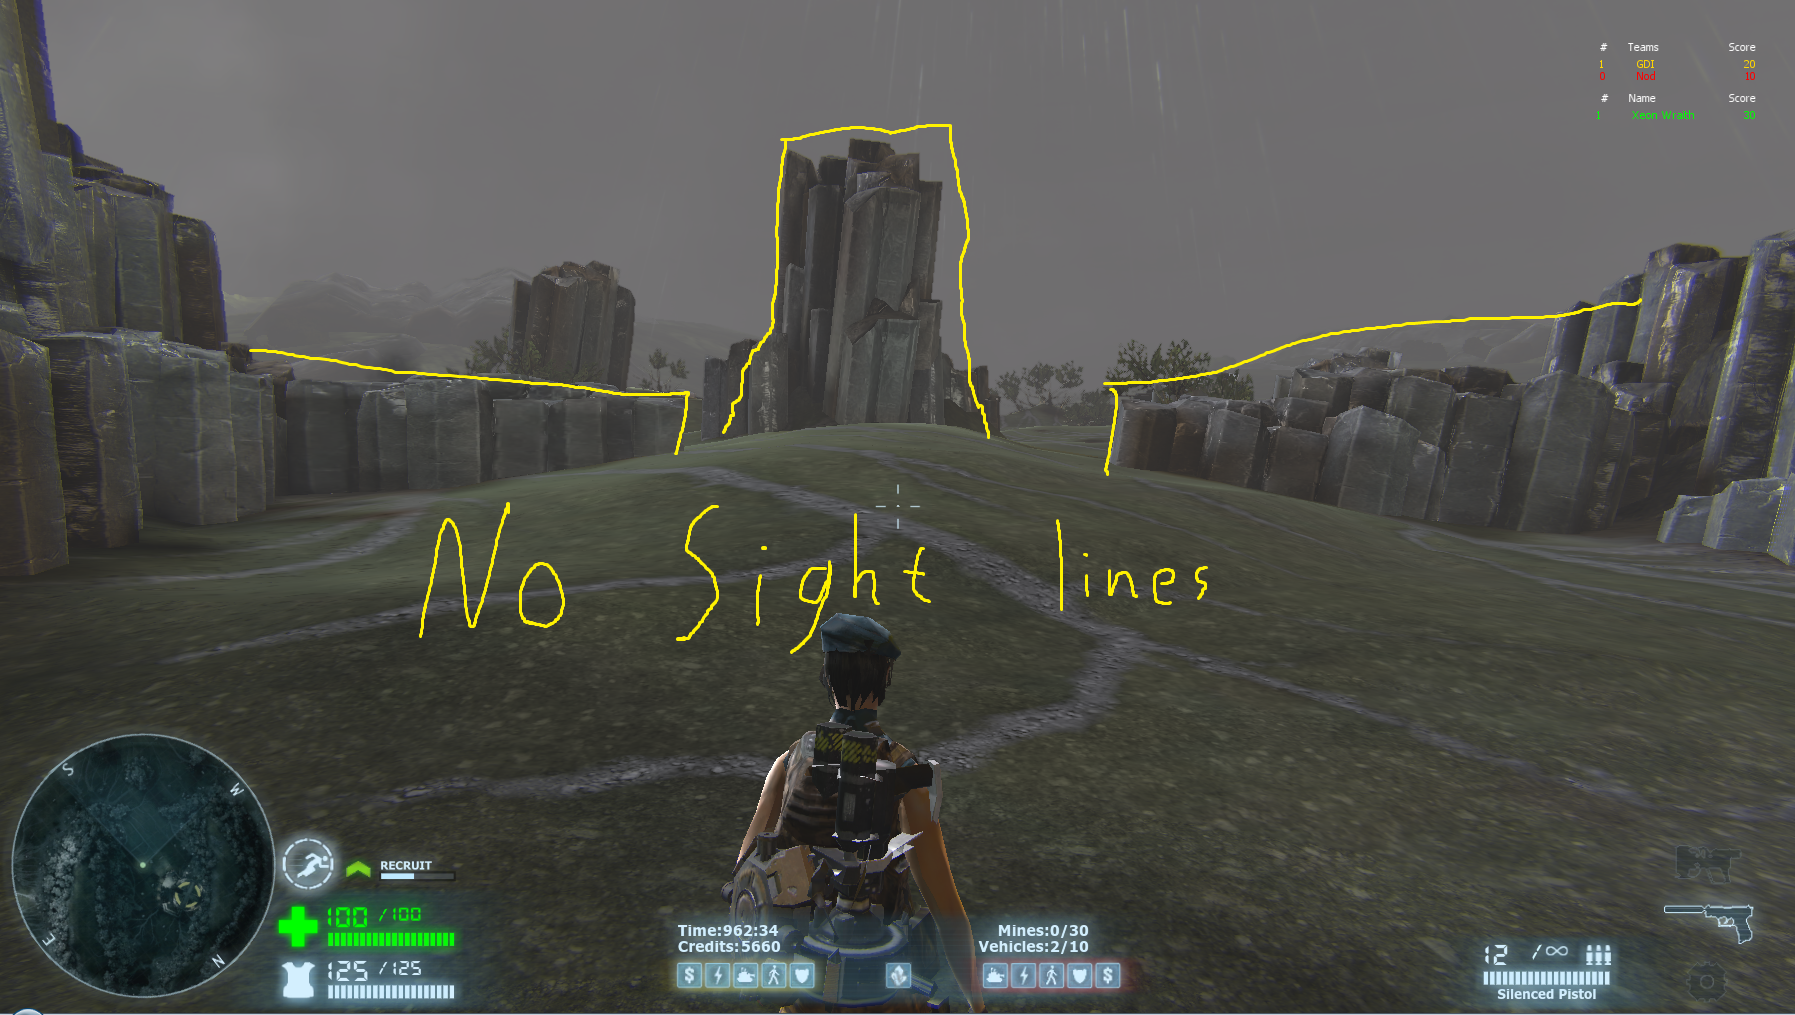
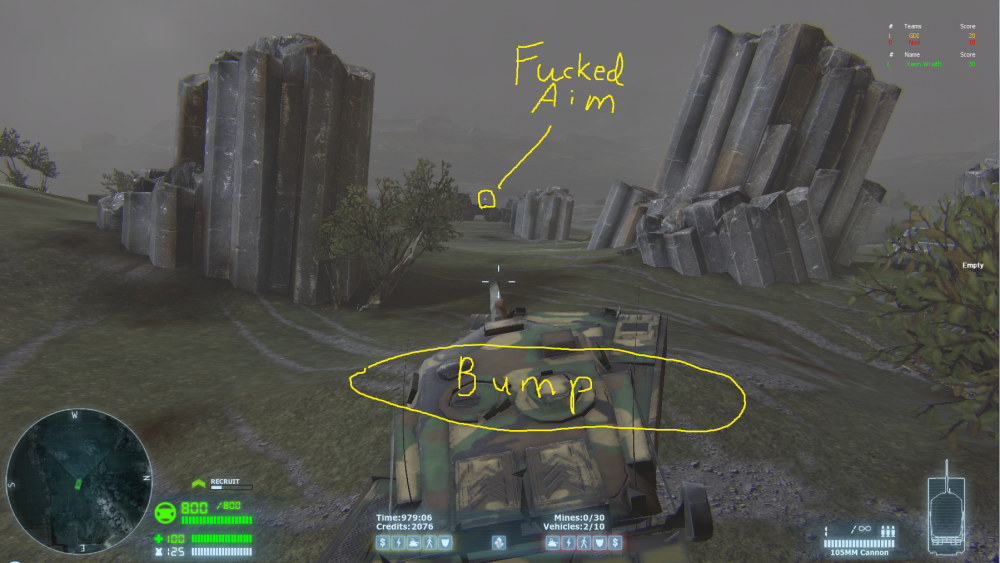
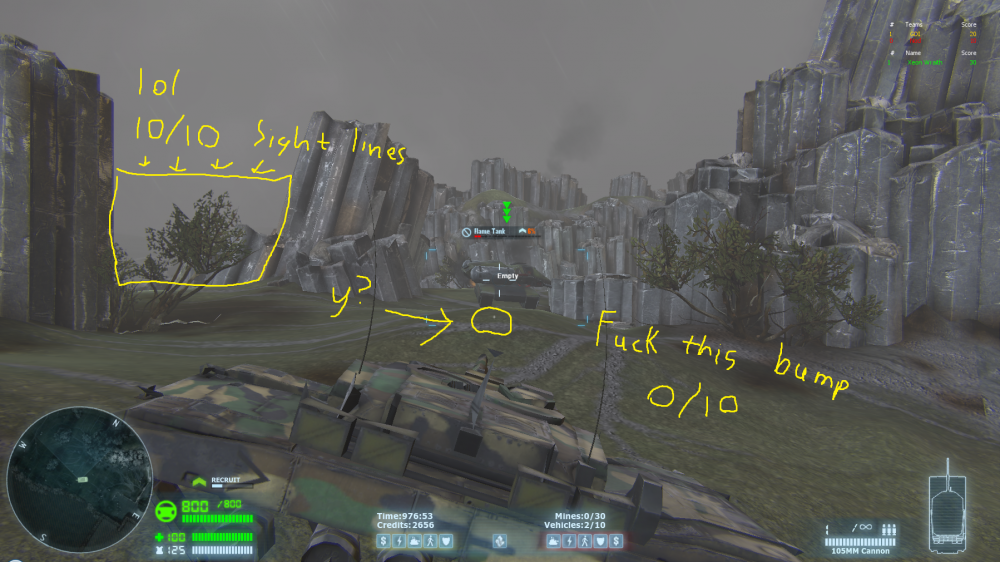
I thought I'd join in on using paint with screenshots. In a nutshell, these are my issues with Mesa. I also have a few ideas to counter the early flamer, if Mesa isn't already removed from the map pool.

-
On Light tanks: (I'm assuming Light tanks are meant used as a 'bullet-sponge' on open maps, in a similar manner to a flame tank would in smaller maps.) The fundamental issue with light tanks I can see is that they're simply not competitive DPS wise verse enemy field repairs. In a typical composition of arties/lights, most of skilled players would simply ignore the light tanks and focus on the arties. Increasing the defensive capabilities of the light tank doesn't make them more dangerous - on the contrary this just incentivises players to kill weaker vehicles more. In the event where light tanks where are actually flanking and are posing a threat to field repairs, they're usually extremely close, rendering slower projectile speeds meaningless. Also keep in mind reduced projectile speeds does also buff the rest of Nods' tank lineup. Considering the relatively high amount of cover on most maps, you could probably dodge a similar amount of shots with other vehicles as you may do with a light tank. It doesn't strictly have to be a DPS buff, light tanks simply need to be more threatening. Increasing projectile speeds or increasing splash radius for anti-repairs might also work. Side note: For players interested in getting better at dodging enemy shots, it's considerably easier to dodge based on timing rather reaction. Most players tend to mindlessly hold down the fire button which makes dodging their shots while in cover rather trivial. Don't use this on me please. On Mammoth tanks: They're absurdly player efficient. A single mammoth with field repairs can apply pressure on significantly more players on Nod's side than spent with the mammoth. Add in the fact both teams have equal vehicle limits, it eventually gets to a point where Nod just doesn't have the vehicle or player numbers to deal with everything. Not too sure how to deal with this. Perhaps increasing the vehicle supply cost to 2 for a mammoth tank? Might also be worth looking into decreasing veterancy advantages so they don't snowball as hard with their field control.
-
The hill is pretty heavily exposed from GDI's refinery ledge. Should be possible to pressure sieging arties with gunners from there. While the hill defilade can act as cover for the arties, it seems to be too far back to target the ref and the slope makes shelling the main vehicle path difficult. You could probably rollout medium tanks while the gunners pressure the arties into the defilade. If they have sufficient repairs to out-sustain the gunners then it'll probably be better just to infantry rush with them instead. This does have a pretty heavy player cost though. The alternative of course is simply not to APC rush and to take some early field control instead. Also if you're pushing out against a Nod controlled hill, stick close to ref-side mountain. Not only does it put you closer to firing range than anywhere else on GDI's vehicle path, the mountain is far better hard cover than any of the rocks in the river for avoiding splash.
-
New players are always welcome - and this game is great
Xeon Wraith replied to ex_member's topic in Renegade X
Eh, honestly i'd agree with Jpj for the most part. Tanking is a numbers game. If you can kill a opponent in fewer hits than they can kill you, you'll win. Stack numbers with VP advantages, position and repairing. Inf battles, eh. Can't really stack numbers much when you can always OHKO with a 1K. Can't comment on how easy/hard either is. Also, hello new players.